


If This Then That (IFTTT) is a cloud based service that can perform functions when it is triggered by an event. You can link your Smartfire Controller to IFTTT so that you can trigger events like flashing your LIFX lights or forwarding the status data to your home automation system.
Note: This feature is specifically for folk with IT experience and knowledge, or a keen ability to Google for tutorials! Due to the infinite range of potential services you can connect:
- Smartfire does not provide *any* technical support for this feature
- Smartfire does not provide any kind of service guarantee, it may stop working so don't rely on it, it's best effort
- You will need the firmware and app updates from May 15 2020 to use IFTTT.
Let's do a quick walkthrough of basic setup. We'll need to create an IFTTT account, link the Webhook service
IFTTT Account Setup
- Create an account on IFTTT
- Connect the Webhooks service
- Click the 'documentation' link on the Webhooks service
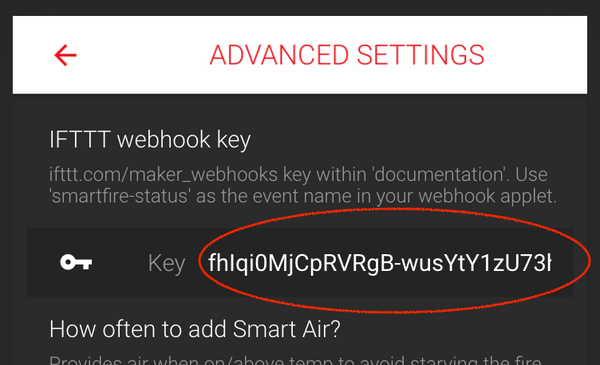
- Copy your Webhooks key
It'll show you a screen like this:

Copy your webhook key for use in the next steps.
Create an Applet
- Go to 'Create' either from user profile drop down menu or this link
- Click the 'This' to configure what the input event is
- Search for the Webhooks service and choose it
- Click the 'receive web request' trigger
- For the event name, use "smartfire-status". Don't get creative!
- Now we need to define the 'that', so click 'that' to proceed
- You could choose any of the partner services that you like at this stage. There are hundreds of integrations from email notifications, playing music, toggling smart power switches. For universal accessibility, for this tutorial we are simply going to email ourselves the status event that has been received.
- Search for Email and follow the prompts to authenticate your email account
- Choose the 'Send me an email' option
- It'll prompt you to modify the event fields etc, but just leave it as the defaults and click 'Create action'
Link your Smartfire to IFTTT
- Open the app and go to Advanced Settings for the controller you are interested in (Click the pit probe, click top right menu and choose 'advanced settings')
- There is a field for IFTTT key, paste the key you saved before into this field and wait a few seconds for it to save the settings
Testing
- Turn on your Smartfire Controller, and presuming it's connected to Internet you will be seeing emails arrive within a minute.
- Congratulations, you've created your first IFTTT applet!
Further steps
There are a myriad of IFTTT integrations with popular household brands. It's only your imagination that limits the possibilities. Let us know via the Smartfire Owners group on FB any cool ideas that you come up with!
Advanced technical discussion
If you wish to forward the webhook request onto something like HomeAssistant what you'll do is:
- Instead of an email action, use a webhook action to "make a web request"
- Choose POST action and set content to application/json
- For the body, use the variables that are available:
{ "event": "{{EventName}}", "data": {{Value1}}, "mode": "{{Value2}}" } - This will post an event with the following example payload:
{ "event": "smartfire-status", "data": {"f1": >32, "f1t"=>180, "f2"=>32, "f2t"=>130, "f3"=>32, "f3t"=>130, "pit"=>71.76, "pt"=>240, "ph"=>265, "pl"=>198, "sp"=>240, "fan"=>0, "mode"=>"FANDISABLED", "rssi"=>-32, "t"=>1589085021000, "alarm"=>"none", "ra"=>"-182.3"}, "mode": "3e002200044738353REDACTED" } - You will likely need to do some data massaging to add device identifiers etc to match your destination system assets. Your best option is to use a cloud based nodejs processor, both Google Cloud Functions and Pipedream.com have free plans that you can easily process an inbound web request and then forward in the format you require to your destination service. You can even use platform.iffft.com to create a basic data formatter to add some extra hard coded device IDs etc.
- Enjoy!

Share:
Christmas Ham Recipe
COVID Update